
Table of Contents
What DKIM is and why it matters
DomainKeys Identified Mail (DKIM) functions as an email authentication system utilizing cryptographic signatures to verify that an email was permitted by the sending domain and remains unchanged during its journey. This process involves two keys: a private key, which is securely kept on your email server or with a third-party service, and a public key, which is made available in a DNS TXT record associated with your domain. When receiving mail servers conduct a DKIM verification, they retrieve the public key from DNS and check the digital signature contained in the DKIM-Signature header of the email.
How selectors, DNS TXT records, and public keys work together
- Selector and DKIM Selector: A selector serves as an identifier (such as s1, 2024, google) that instructs receiving systems on which DKIM record to access. Utilizing multiple selectors enables key rotation without any service interruptions.
- DNS TXT and DKIM DNS Record: For each selector, you create a DNS TXT record at selector._domainkey.yourdomain. This DKIM record includes essential tags that define the DKIM key, such as the version (v=DKIM1), the key type (k=rsa), and the base64-encoded public key (p=).
- Record Lookup: When checking a dkim record, receiving systems perform a DKIM lookup for that specific name to fetch the public key and complete the signature verification process.
The private key and digital signature
Each outgoing email is signed by your private key, generating a DKIM signature that includes certain headers and occasionally the email body. The recipient’s system utilizes the public key published in the DNS, typically based on RSA encryption (commonly 2048 bits), to validate the signature’s integrity. This verification process ensures both the authenticity and integrity of the message, aiding in the prevention of spoofing and enhancing protection against phishing attacks.
How DKIM complements SPF and DMARC
DKIM by itself doesn’t enforce policies; instead, it verifies the authenticity of a domain for each individual email. When combined with SPF and DMARC, DKIM enhances both the security and deliverability of emails. SPF grants permission to specific sending servers, while DKIM provides a signature that indicates if an email has been altered. DMARC ensures that the domain used for signing matches the visible headers and gives instructions to recipients on how to respond to issues. Additionally, features like BIMI, MTA-STS, and TLS-RPT bolster trust signals and improve transport security.
Where to obtain the selector from common providers
- Google Workspace: To set up DKIM, navigate to the Admin console. Google will provide you with a selector (such as google, google.domainkey, or a custom label) along with the necessary DNS record content.
- Microsoft 365 (Exchange Online): In the Admin Center, go to the DKIM section, which lists domain-specific selectors (such as selector1, selector2) and the relevant records you need to publish.
- SendGrid: Within the Sender Authentication section, SendGrid generates CNAME or TXT records that link to hosted keys — make sure to pay attention to the offered selector values.
- Mailchimp and Other Email Service Providers (ESPs): Their domain authentication tools will show the required selectors and records. If using hosted keys, you might need to create a CNAME pointing from selector.domainkey.yourdomain to a vendor’s domain.
Confirm the exact domain to check
The domain you use for signing could either be the main domain or a subdomain, such as mail.example.com. The DKIM record is located at selector._domainkey.signingdomain. Make sure to follow your Email Service Provider’s guidelines and check your DNS provider’s zone to determine where the DNS record needs to be placed. If you’re setting up DKIM for several brands, you’ll need a distinct DKIM selector for each signing domain.

How to check a DKIM record
A comprehensive examination to check DKIM record settings includes using both command-line tools and web-based validators to verify the record’s syntax, confirm the accuracy of DKIM tags, and ensure the public key is properly published and reachable in DNS.
Query syntax and CLI tools
To conduct a simple DKIM lookup, utilize conventional DNS tools as follows:
- For dig: Run the command `dig TXT selector.domainkey.example.com +short`
- For nslookup on Windows: Use `nslookup -type=TXT selector.domainkey.example.com`
- For host on Unix systems: Execute `host -t TXT selector._domainkey.example.com`
If your service provider employs a CNAME, make sure to follow it to confirm that the final response is a TXT record containing the public key (p=). For automated audits, consider scripting a lookup across all selectors in your setup.
Reputable online lookup and validators
If you’re seeking a different perspective or a more user-friendly tool, consider using a DKIM record checker or validator.
- MXToolbox: Known for its reliable DKIM check and testing interface.
- EasyDMARC: Features an extensive DKIM record checker along with tools like an Email Header Analyzer, DMARC XML Report Analyzer, Domain Scanner, EasySPF, Reputation Monitoring, Phishing Link Checker, and Alert Manager for ongoing record validation and oversight.
For community-driven validation, platforms like G2 Crowd, SourceForge, and Expert Insights can assist in comparing different tools. EasyDMARC’s accolades, including mentions in the Channel Program Award, emphasize its strong features for domain authentication initiatives.
Moreover, resources such as KnowBe4 for phishing protection training and documentation provided by Google, Microsoft, SendGrid, and others like EasySender and Touchpoint can be instrumental in implementation. Many vendors also provide an Academy, MSP Program, Reseller Program, or Wholesale Program to aid their partners.
Confirm version, key type, and the public key
- v=DKIM1: Ensure that the version tag for the protocol is included.
- k=rsa: Confirm that the algorithm, typically RSA, is indicated.
- p=…: Make sure the DKIM public key is included and is not empty.
If the record points to a CNAME, trace it to find a hosted key, and ensure that you receive a TXT record containing the p= value. If the p= value is missing, the DKIM record will be considered inactive.
Key length, formatting, and hosted keys
- Key Size: It’s advisable to use 2048-bit RSA keys to enhance security and uphold sender credibility, as many recipients now consider 1024-bit keys as inadequate.
- Record Structure: TXT strings can be divided into segments of up to 255 characters. It’s important to make sure that all quotation marks are matched correctly, no unintended spaces disrupt the base64 encoding, and that the p= value remains unbroken after merging.
- Managed Keys and CNAME Records: A DKIM record can point to a provider-controlled target through a CNAME. This is frequently found with third-party email service providers and makes key rotation easier.
Record and signature validation steps
- Record Validation: Ensure that v, k, and p are included; check for any prohibited tags; verify that the syntax adheres to vendor specifications.
- Signature Validation: Dispatch a test message and utilize a DKIM validator or Email Header Analyzer to confirm that the DKIM results indicate a pass, and that the signing domain is consistent with DMARC.
Resolve common errors quickly
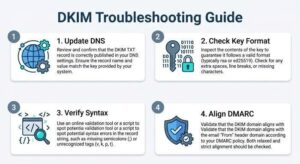
Tips for Troubleshooting DKIM Issues
- Selector and Domain Name Errors: Make sure the DKIM selector aligns with your provider’s configuration, and verify that you are checking the right signing domain.
- DNS Update Delays: Changes to DNS records can take time to propagate. Check the TTL settings and be patient while the caches refresh.
- Key Formatting Problems: When copying the public key (p=), do so carefully to prevent line breaks that could disrupt the base64 encoding.
- Duplicate TXT Records: Ensure there’s only one TXT DKIM record for each selector._domainkey entry. Combine values only if your provider allows it.
- CNAME Record Verification: If you are using a CNAME, ensure it points to a TXT record containing a valid DKIM key.
- Syntax Errors: Double-check tags and values for accuracy; even small mistakes can impact DKIM verification results.
Rotate keys and align with policy
- Key Rotation: Create a fresh pair of private and public keys using a different selector. After publishing the new DKIM record and transitioning the signing process, phase out the old selector. This approach reduces risk and facilitates ongoing operations.
- DMARC Alignment: Verify that the signing domain (d=) corresponds with the displayed From: domain, in accordance with DMARC requirements. Correct alignment enhances domain verification and mitigates spoofing attempts.
- Enhanced Controls: Ensure preparedness for SPF, DMARC, and BIMI, and evaluate transport policies such as MTA-STS. Additionally, implement monitoring through TLS-RPT.
Ongoing monitoring and audits
Create a systematic approach for checking DKIM records and conducting DKIM lookups across all your domains.
- Utilize DKIM record assessment tools like EasyDMARC or MXToolbox for regular scans.
- Keep an eye out for expired or weak cryptographic keys, setting up automated alerts using solutions like Alert Manager.
- Monitor changes and performance with tools such as Reputation Monitoring and the DMARC XML Report Analyzer.
- Regularly reassess configurations through Domain Scanner and EasySPF, ensuring that internal documentation for DKIM practices is up to date.
By embedding these practices — accurate record maintenance, systematic DKIM checks, periodic key updates, and ongoing surveillance — you will ensure strong email authentication that adaptates alongside your needs, safeguarding both your brand and recipients.